物体認識 with Tensorflow
2023-12-30 python tensorflow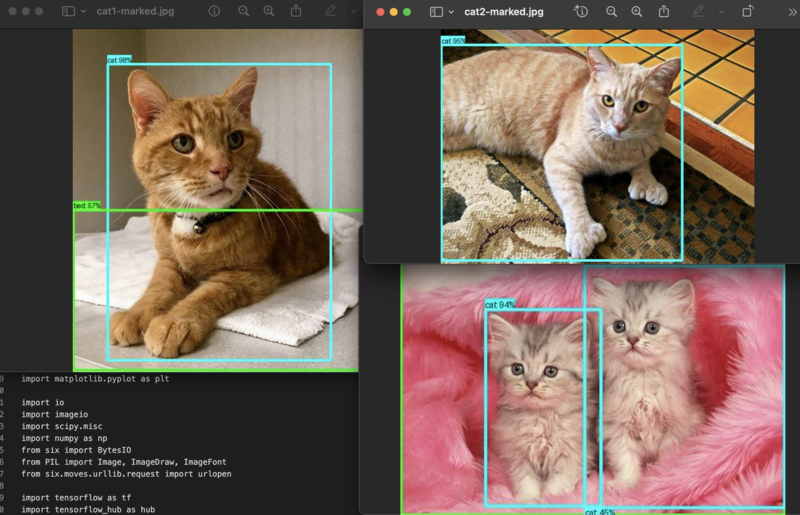
前回に引き続きRaspberryPi上でtensorflowを動かして、今度は物体認識にチャレンジしてみました。TensorFlow Hub Object Detection Colabのコードを改造してRaspberryPi上で動作するようにしてみます。
以下が実際に動かしてみたコードです。MODELはどれを選べば良いのか分からず適当で、キーポイントは今回使用せず(コメントアウト)、detection_boxだけを描画しています。
結果(result)を取得するところまでは良いのですが、object_detectionパッケージはどうもあまりメンテされていないのか、たまたま他のライブラリのバージョンと不整合を起こしていたのか、かなり手を入れないと動きませんでした。
import os
import pathlib

import matplotlib
import matplotlib.pyplot as plt

import io
import imageio
import scipy.misc
import numpy as np
from six import BytesIO
from PIL import Image, ImageDraw, ImageFont
from six.moves.urllib.request import urlopen

import tensorflow as tf
import tensorflow_hub as hub

tf.get_logger().setLevel('ERROR')

def load_image_into_numpy_array(path):
  """Load an image from file into a numpy array.

  Puts image into numpy array to feed into tensorflow graph.
  Note that by convention we put it into a numpy array with shape
  (height, width, channels), where channels=3 for RGB.

  Args:
    path: the file path to the image

  Returns:
    uint8 numpy array with shape (img_height, img_width, 3)
  """
  image = None
  if(path.startswith('http')):
    response = urlopen(path)
    image_data = response.read()
    image_data = BytesIO(image_data)
    image = Image.open(image_data)
  else:
    image_data = tf.io.gfile.GFile(path, 'rb').read()
    image = Image.open(BytesIO(image_data))

  (im_width, im_height) = image.size
  return np.array(image.getdata()).reshape(
      (1, im_height, im_width, 3)).astype(np.uint8)

MODEL = "https://tfhub.dev/tensorflow/centernet/hourglass_512x512/1"
hub_model = hub.load(MODEL)

image_path = "cats/cat1.jpg"
image_np = load_image_into_numpy_array(image_path)

# Flip horizontally
# image_np[0] = np.fliplr(image_np[0]).copy()

# Convert image to grayscale
# image_np[0] = np.tile(np.mean(image_np[0], 2, keepdims=True), (1, 1, 3)).astype(np.uint8)

# plt.figure(figsize=(5,5))
# plt.imshow(image_np[0])
# plt.show()

# running inference
results = hub_model(image_np)

# different object detection models have additional results
# all of them are explained in the documentation
result = {key:value.numpy() for key,value in results.items()}
print(result.keys())
print(result["num_detections"])

label_id_offset = 0
image_np_with_detections = image_np.copy()

# Use keypoints if available in detections
keypoints, keypoint_scores = None, None
if 'detection_keypoints' in result:
  keypoints = result['detection_keypoints'][0]
  keypoint_scores = result['detection_keypoint_scores'][0]

print("## using object_detection_utils ##")
from object_detection.utils import label_map_util
from object_detection.utils import visualization_utils as viz_utils
from object_detection.utils import ops as utils_ops

PATH_TO_LABELS = './models/research/object_detection/data/mscoco_label_map.pbtxt'
category_index = label_map_util.create_category_index_from_labelmap(PATH_TO_LABELS, use_display_name=True)

viz_utils.visualize_boxes_and_labels_on_image_array(
      image_np_with_detections[0],
      result['detection_boxes'][0],
      (result['detection_classes'][0] + label_id_offset).astype(int),
      result['detection_scores'][0],
      category_index,
      use_normalized_coordinates=True,
      max_boxes_to_draw=200,
      min_score_thresh=.30,
      agnostic_mode=False)
      #keypoints=keypoints,
      #keypoint_scores=keypoint_scores,
      #keypoint_edges=COCO17_HUMAN_POSE_KEYPOINTS)

plt.figure(figsize=(5,5))
plt.imshow(image_np_with_detections[0])
plt.show()

imageio.imwrite('cats/cat1-marked.jpg',image_np_with_detections[0])
print("fin.")
以下のように実行すると、発見した物体を枠で囲った画像が出力されます。
./venv/bin/python3 find-cats-tf.py
このコードをRaspberryPi(4,4GBメモリモデル)で動かすと、3分程度かかってしまいます。実用にはなかなか大変かもしれませんが、一つの画像に何が写っているかを判断するのに、どれほどの処理を行なっているかということを理解するのには向いていそうです(^^;